


 Valheim
 Import a Valheim world by uploading its save data to the /.config/unity3d/IronGate/Valheim/worlds_local directory on your server, then pointing the World Name option at that world. The source can be your own client or another host’s server.
What Valheim 1.0 changed
Before 1.0, every world was a matching .fwl and .db file pair. Valheim 1.0 replaced that with a folder based format: each world is now a folder inside worlds_local, named after the world, holding the world metadata and the world data split into smaller pieces. Backups sit in their own folders. Only the pieces that change get rewritten on each save, which is why saves are faster on 1.0.
Both formats are covered below:
- World last saved on Valheim 1.0: transfer the whole folder named after your world.
- World last saved before 1.0 (Early Access, or a server still on an older build): transfer the
.fwland.dbpair. The server converts it to the folder format the first time it loads, writing a backup first. That first load can take a few minutes.
If you are not sure which you have, open worlds_local and look. A folder with your world’s name means 1.0 format. Two loose files means the older format.
Quick answer
- What you need: everything in
worlds_localthat carries your world’s name. On 1.0 that is one folder. On older worlds it is a.fwlfile and a.dbfile, for exampleMyWorld.fwlandMyWorld.db. Skip anything withbackuporoldin the name. - On a Windows client:
%AppData%/../LocalLow/IronGate/Valheim/worlds_local. Cloud saves have to be moved to local first. - On another server:
/.config/unity3d/IronGate/Valheim/worlds_localon Linux, the client path above on Windows. The default world name isDedicated. - Where it goes:
/.config/unity3d/IronGate/Valheim/worlds_localon your WinterNode server, uploaded over SFTP or through the File Manager. - The step people miss: set the World Name option to match the world, or the server will generate a fresh world and ignore yours.
Locating the save data
Importing from your client
Windows clients, on Steam or Xbox, store worlds at %AppData%/../LocalLow/IronGate/Valheim/worlds_local. On Valheim 1.0 that folder holds one subfolder per world. On a client that has not updated yet, it holds a .fwl and a .db file for each world instead. Either way you will also see Valheim’s automatic backups. If your save lives on the cloud, move it to local first.
Select the folder (1.0) or the .fwl and .db files (older worlds) bearing your world’s name, excluding anything that contains backup or old, and compress your selection for upload. Upload the archive to .config/unity3d/IronGate/Valheim/worlds_local on your server, then extract it in the File Manager. Finish by configuring your server to use the imported world.
Downloading a cloud world
Steam and Xbox clients on Windows can keep saves on the cloud, and a cloud save has to be moved to local storage before you can import it.
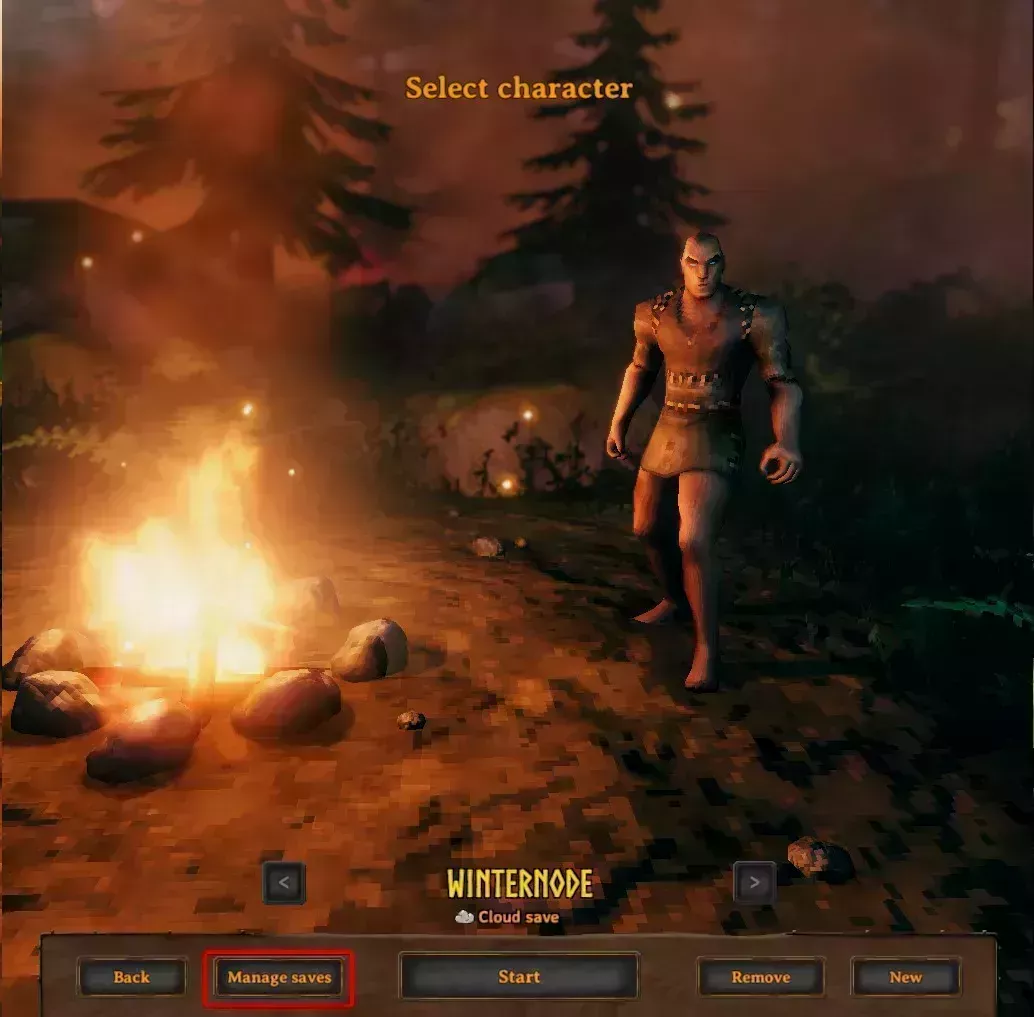
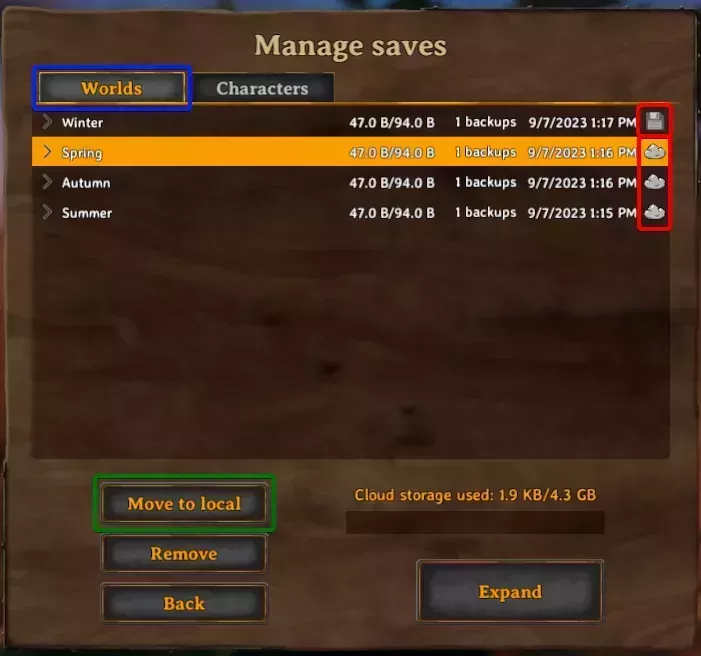
Click Manage saves on the Select character screen, then switch to the Worlds tab.
Cloud saves show a cloud icon on the far right of the list, local saves show a floppy disk. Select the save you want and click Move to local. The same button reads Move to cloud when a local save is selected.
Once the world is in %AppData%/../LocalLow/IronGate/Valheim/worlds_local, follow the steps in Importing from your client.
Importing from another server
Linux servers store worlds in /.config/unity3d/IronGate/Valheim/worlds_local, Windows servers use the client path above. Both default to a world named Dedicated, which the host can override with the -world command line argument (for example, -world "MyWorld"), so check the host’s panel or startup command if you are unsure of the name.
In that folder, a server on Valheim 1.0 keeps each world as a folder named after the world. A server still on an older build keeps a .fwl and a .db file per world. Anything with backup or old in the name is a Valheim automatic backup and you can leave it behind.
Compress the folder or the file pair, download it, then upload the archive using SFTP to /.config/unity3d/IronGate/Valheim/worlds_local on your WinterNode server and extract it in the File Manager. Finish by configuring your server to use the imported world.
Configuring your server
You should now see your world in .config/unity3d/IronGate/Valheim/worlds_local, either as a folder or as a .fwl and .db pair, named after the world on your old server or client. Any other worlds in that folder, including the server’s default Dedicated world, can be deleted if you don’t want to keep them.
Then set the World Name server option to your world’s name. That is the folder name on 1.0, or the file name of the .fwl and .db files on an older world. You’ll find it under your server’s Management → server options tab, or you can pass it on the startup command with the -world flag if you’re not using our Game Panel, for example -world "MyWorld".
Start the server. If you imported a world last saved before 1.0, the first load converts it to the folder format and writes a backup before it does. This can take a few minutes with nothing visible in the console. Let it finish. Every load after that is normal speed.
Frequently Asked Questions
It depends on when the world was last saved. A world last saved on Valheim 1.0 is a single folder in worlds_local named after your world, and you upload the whole folder. A world last saved before 1.0 is two files sharing your world's name, a .fwl file and a .db file, for example MyWorld.fwl and MyWorld.db. Either way, leave behind anything with backup or old in the name.
The World Name server option does not match your uploaded world. Set it to the exact world name, which is the folder name on 1.0 or the file name of the .fwl and .db files on older worlds, then restart the server.
If you imported a world last saved before 1.0, the server converts it to the new folder format on first load and writes a backup before it starts. This can take a few minutes with nothing visible happening. Let it finish. It only happens once.